Showing posts with label digital photography. Show all posts

Tuesday, December 8, 2020

The one post a day challenge

Four years ago, in 2016 I started this blog http://andreasrmueller.blogspot.com/ with a little project.

The challenge was to post one contribution on photography every single day. - This resulted in an interesting collection of content on and about photography. A summary review can be read in the post on December 31st, 2016.

Over the year a lot of interesting content came together. Content on travel photography, on underwater photography, on photography techniques, on cameras, technology, and picture reviews. 

It was a challenge to post one contribution per day. But it was also rewarding to research and compile content on a regular basis and produce the 365 individual contributions.

Now, four years later going into 2021 my New Years resolution will be to contribute some more serious content about photography in general, and my personal photography creations in particular. Not on a daily but on a more or less regular basis.

Please come back and see. Subscribe to our blog.

Friday, October 28, 2016

Shooting a 300 Megapixel Photo

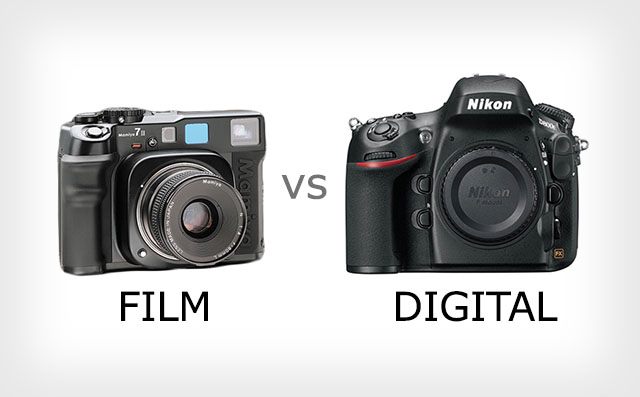
The controversy around megapixels in today's photography world is big. And what is better resolution wise? The digital or the good old film technology?

Markus Hofstaetter gives some answers in a recent blog post on petapixel.com.
In this post he describes a photography job where huge resolution did matter. Since the required 300 megapixel resolution was pushing all limits of gear the photographer decided to apply two strategies.

Digital:
Using a Canon 5D Mark III he took a series of pictures which were stitched together in post processing to a huge high resolution image.

Film:
Applying a Linhof Master Technika loaded with Kodak Portra 160 VC film in one shot and professionally scanning that photograph.

The results are both amazing. - See the blog post for more details.
Apparently the customer went for the film version since he did like more the look.

Saturday, October 1, 2016

Mirror Less Medium Format Cameras

Is 2016 becoming the year of mirror less medium format photography?

After the introduction of the Hasselblad medium format mirror less camera x1d earlier this year Fujifilm introduced their version of a mirror less medium format product line - GFX 50s - at the Photokina show.


Sunday, September 25, 2016

Medium Format Digital Photography

Now, digital medium format is coming.

Fujifilm is the next one to go medium format.

The GFX 50S is the first digital medium format camera by Fujifilm.

Read the following blog post for recent news: link

Thursday, July 14, 2016

High End Cameras - Alpa Phase One

Have a look at this humanistic report by Kai W. on the high end Alpa Phase One camera. - Testing out the gear lead to several spectacular failures...


And a second report using the medium format Phase One for high end large scale photos:

Sunday, June 26, 2016

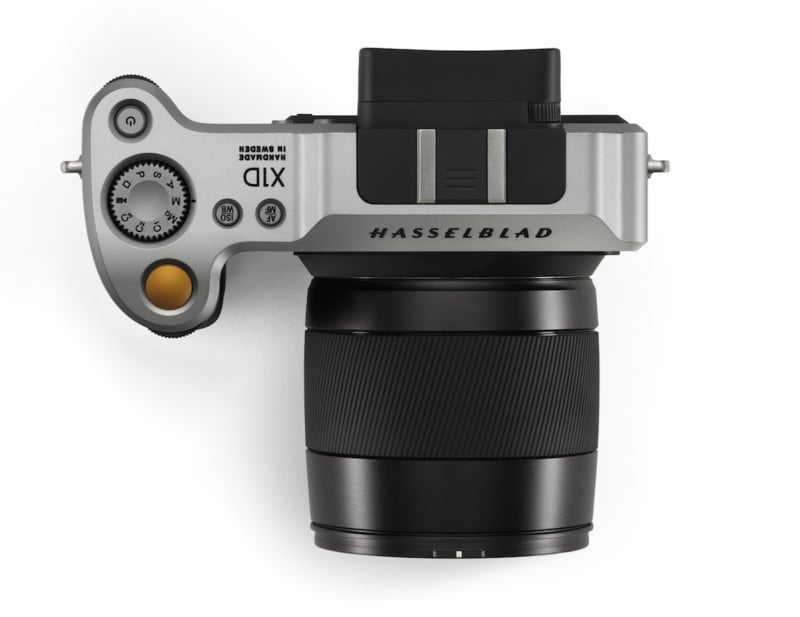
Hasselblad X1D - Mirrorless Digital Medium Format

Camera manufacturer Hasselblad from Sweden just recently launched the Hasselblad X1D.
X1D is the first mirrorless digital medium format camera.

The camera comes with a 50MP CMOS sensor in a housing no larger than a full format DSLR camera.

The sensor has a dimension of 44 x 33m with a single pixel size of 5.3 x 5.3 micro meter.

Together with the camera a new series of lenses has been introduced. This XCD series of lenses are optimised for this mirror less setting. However, current H System lenses fit the camera using an optional adapter.

"Small enough to take anywhere, powerful enough to capture anything."

This invention brings high end glass and sensor technology to a handy form factor which allows the use of digital medium format in many more situations than current solutions.

Saturday, June 4, 2016

New Software Promises to Take the Grunt Work Out of Ranking Your Images

New Software Promises to Take the Grunt Work Out of Ranking Your Images: Powered by artificial intelligence, Picturesqe organizes your images automatically and tells you which ones look the best. Welcome to the future.

Thursday, January 14, 2016

The Analog/Digital Hybrid Workflow

Recently I decided to further integrate my analog/digital hybrid photography workflow.

Shooting film is a complete different experience than shooting digital. It takes lot more time, awareness, and slowing down the entire creative process.

After having shot the images on film, I am still getting them developed by a commercial laboratory. - However, I am already in the planning process of setting up and learning my own film development chemistry process.

The developed film - negatives or positive slides - is then digitised on a scanner.

I recently invested into an Epson perfection V800 Photo scanner which allows me to scan my own photographs at resolutions as high as 9600 dpi.

It is indeed a very time consuming process. But, it is also a good feeling to have more control over my entire development workflow.

While using the scanner for my recent Hasselblad 500 c/m medium format photography work, I also started to scan old self-developed 35 mm negatives from my early days of photography back in 1993.

The results are pretty amazing.
...I will soon be sharing some results here...

Sunday, December 27, 2015

Sony RX100 Mark III pocket camera

Shanghai at night, Sony RX 100 Mark III
Since a bit more than a year I am using a Sony RX100 Mark III point and shoot camera for occasional street photography when it is not possible for me to carry along my DSLR. The results are amazingly good.

Especially in challenging light situations such as low light or large contrast this camera does a very good job. The image quality some times is even better then some of the DSL cameras.

The camera has a 20.1 MP CMOS sensor. The sensor has a size of 13.2 mm x 8.8 mm which is quite large for such a small camera.
Paris la Défense, Sony RX 100 Mark III
Further more the camera is equipped with the same BIONZ X engine for in camera noise reduction. The same as the in Sony Alpha series cameras.

Besides the high quality sensor and image processing the Sony implemented a ZEISS Vario-Sonnar T* 24-70 mm f1.8-2.8 lens into the RX100 Mark III.

This combination of high quality optical glass, a high performance sensor and image processor built in a small form factor makes it a very interesting alternative to DSLR equipment when space is limited.

The camera is also physically robust since everything is built into a solid metal housing. This is in particular important for such a small camera that fits into any pocket.

Other features, such as the built in WiFi interface allows easy access to the photographs via smartphone or tablet for further processing and sharing of the artistic work. This further supports the space limited travellers use case.

And one more feature which sets the camera apart from other point and shoot cameras is the built-in electronic viewfinder which gives a completely different photographers' experience compared to the on display image composition applied using pocket cameras and smart phones.

For detailed technical specifications visit the Sony product page.

In the mean time there is a newer version of the same camera available. The Sony RX100 Mark IV which introduces, among other features, several technical improvements for video capturing in 4K.

Watch the Sony RX100 Mark III review by Ted Forbes, The Art of Photography channel on Youtube:


Visit my Shanghai street photography gallery. All images shot using the Sony RX100 Mark III camera.

Shanghai - Images by Andreas Mueller

Monday, December 21, 2015

Medium Format Cameras

What are reasons to use medium format cameras?

Main reason is the size of the image capturing medium which is either a CCD/CMOS sensor or classic film.
The result is both high resolution with low noise in the image and greater dynamic range with much better transitional tonal values in color.
Both is driven by the larger format compared to 35mm (3-4 times the size) or even crop sensor formats when talking of digital.

Watch the documentary from Karl Taylor explaining the medium format advantages.


Sunday, December 20, 2015

My landscape photography year 2015

On my landscape photography projects I was shooting digital using my Nikon cameras as well as film using my Hasselblad 500 c/m.

Mt. Rigi towards Mt. Pilatus, Nikon D4
Two times I went to mount Rigi in central Switzerland for beautiful landscape
photography.

Especially in winter time - my first trip was in February - this was an interesting experience. The landscape down in the valleys and around the lake Lucerne were covered in fog, while the snow covered peaks of the Swiss Alps were in brightest sunlight.
Mt. Rigi, Hasselblad 500 c/m

The beauty is not only in the breathtaking landscape - which from Mt. Rigi almost covers a 360° view of entire Switzerland - but also in the details. Details such as the snow structures formed by wind and temperature, or the trees covered with frosting made out of snow.

From Rigi Kaltbad, Nikon D4
I went back to Mt. Rigi in autumn. A season of the year where weather conditions usually offer a very clear atmosphere.
I got some very nice shots of the surrounding mountains just after sunset.

Lake Lucerne from Rigi, Nikon D4
On the second day the sky was covered and I got a dramatic picture of Lake Lucerne with Mt. Pilatus in the middle.


Lavender fields, Provence, Nikon D4

As reported earlier (post August 16) we made a short trip to shoot the lavender field landscapes in the Provence, south of France.
This was not only visually but also for the sense of smell a breathtaking experience.
To experience landscapes covered with lavender just shortly before harvest I would not like to miss. The various sensations I will retain for a long time in my memory.
The gallery slideshow below shows some of my photographs from that trip taken on film.

2015 July - Lavender fields - Images by Andreas Mueller

Andalusian landscape, Nikon D800
I made some more trips for landscape photography in 2015 among these a trip to Andalusia.
If you ever want to experience scenic landscapes with olive plantations all around until the horizon then go to Andalusia.
Olivera, Spain, Nikon D800

The pictures here are from a September trip. However, the landscape looks completely different during other seasons. For example in spring everything happens to be green while in autumn the landscape resembles more a desert.


Swiss Alps from the Black Forest by Andreas Müller on 500px.com
Swiss Alps from Black Forest, Nikon D4
Swiss Alps from Jura, Nikon D4
A last series of landscape images I produced this year was around the Swiss Alps from a distance. Some of these images were shot from places in the Jura overlooking the Swiss midland plateau, others were taken from the southern Black Forest in Germany.

"Life is like a landscape. You live in the midst of it but can describe it only from the vantage point of distance." -- Charles Lindbergh


Sunday, November 29, 2015

Photo editing now and then

There is a lot of controversy in the photographers community when it comes to post processing photographs. There are analog photo fanatics who claim that analog is the only real thing while most digital images go through digital post processing including heavy manipulation.

However, photo editing independent of the medium has been part of photographic handcraft ever since.

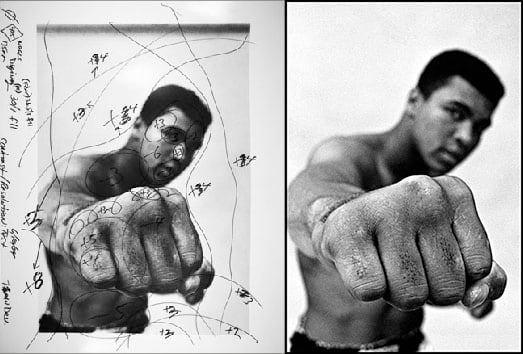
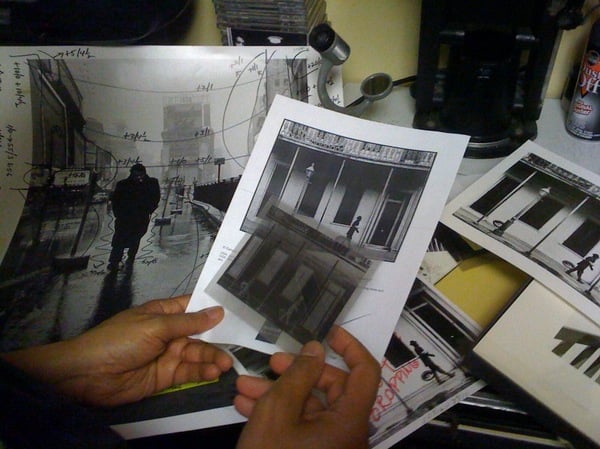
Today I found this interesting article from Michael Zhang (link to PetaPixel) on how iconic prints were edited in the darkroom. The article shows the original first development including markups for later manual editing in a new attempt of development side by side to the final result.
Muhammad Ali, captured by Thomas Hoepker in 1966

The techniques applied in the analog darkroom were not only cropping, cutting out, or adjusting the overall exposure. Having a look at the markups on the sample images of the referenced article a lot is around adjustment of local contrast, detail, background, and local exposure. All elements common to modern digital photo editing (link to Photocritic).

In today's digital world we can apply many steps of editing to one single image. We can easily play with variants, and we can use almost as much time as we want to get the desired result.
Pablo Inirio, darkroom printer at work
In analog technique this all has to happen during the final exposure process of the print in the darkroom by dodging and burning areas of the print and making sure that every area of the photograph gets the right amount of light. This process is a real manual handcraft requiring a lot of experience and a thorough understanding of exposure and development processes. An interesting "before there was Photoshop" 10 minutes video with explanations of these techniques can be found here (link to PetaPixel).

What was the job of a master darkroom printer became the job of an image retoucher in digital times. Techniques remained the same, tools and possibilities might have changed a bit.

Sunday, November 1, 2015

The concept of raw perfection

Yesterday I heard an impressive talk by nature photographer Gregory Basco at the Digital Event in Baden, Switzerland. In his presentation Gregory showed a couple of very impressive and artistic images from the diverse nature of Costa Rica including explanations on how the pictures were captured.

Part of the talk covered Gregory's philosophy around the concept of "raw perfection" (refer to the linked blog post). The approach is around striving for perfection in raw files (no cropping, no cloning, no major post processing) and disclosing and sharing everything which has been done to a photograph.
The approach is around getting the exposure for the entire photograph as well as its composition right directly in camera using a variety of filters, setups of flash, and all kinds of other little tricks.

Some of the examples Gregory presented were astonishing.

One of his compositions involved a short flash exposure of an object in the foreground combined with a longtime exposure of the night sky as background. In order to get both parts of the scene perfectly in focus the focus was readjusted manually during the longtime exposure after the flash for the foreground had fired to the background scenery for sharp exposure of the background sky.

Another one involved the application of a very old technique from analog days called dodging. A beautiful landscape image of a rain forest scenery exhibiting that strong contrast that a perfect exposure within one shot would not have been possible. The foreground of the scenery, the bottom to left part, showed a beautiful greenish forest scenery while the top right part was a forest glade with sun shining in. Hence, the top right would have been heavily over exposed. The "raw perfection" solution was to choose a long exposure, to get the bottom left foreground right, and using a black card to block for some time of the exposure manually the light falling on the top left area of the image. The result is almost a one shot in camera HDR image perfectly exposed in all areas showing the depth and range in the forest scenery.

Many more examples were given. Some of them with creative and elaborate flash and trigger trap setups.

While not that sophisticated I noticed that I am applying a sort of "raw perfection" to my underwater photography for quite some time.
Taking pictures of wildlife in tropical coral reefs or underwaterscapes of mountain lakes is difficult for many reasons.
First of all you have to be a good scuba diver in order to survive the nonviable conditions. Breathing compressed air does not make your brain working more efficiently. And floating in three dimensions instead of moving in two on a stable surface is another challenge.
When it comes to photography techniques you are constantly dealing with low light conditions and with a limited color spectrum. Bringing powerful strobes helps a lot. However, optical conditions are also different for the setup and handling of flash.
My decision to take pictures which need minimal manipulation in post processing was less driven by ethical or artistic motivations. It was more a pragmatic consequence out of laziness. I did not invest into Photoshop but rather into image composition, diving, and camera handling skills.
If I review my underwater photography habits I see many parallels to the principles of Gregory Basco's elements of "raw perfection".

No cropping
My goal is always to control the framing of the image when taking the picture. For macro images this involves going as close as possible, applying diopters, and finding the right angle to have the subjects picture taken. All this without manipulations or destruction of the nature around. Taking the picture should be non invasive.


For wide angle images this is sometimes even more tricky. Wide angle images involve going really close to the subject and bringing in the right amount of light. If you want to capture a dynamic wildlife scene in a nice environment of the reef you are diving all happens within fractions of seconds. You need to get the exposure of the background, the setup of the strobes at the right power for the foreground, the framing and timing right. Usually you have not much more than a single chance since your time is much more limited by your air than on surface.


No cloning
Combining images for nice underwater sceneries is very tempting. It is much easier to take a perfectly exposed image of your non moving background and combine it with an animal you shot out in the blue water in front of a neutral background. I always wanted to capture nature from non obvious point of view. My goal was not to generate the non obvious as a digital artist, my goal is to find the non obvious physically in real and show it.
Imagine the image below with a fish swimming in from the dark in the bottom right! - When I positioned myself underneath this soft coral there was a fish standing just below, but by the time I was setup he decided to move. I waited for quite some time for this fish or some other underwater creature to come back but run eventually out of air, so I focused on this beautiful soft coral scenery backlit from the morning sun.


No major post processing
Apart from some minor adjustments to the white balancing and contrast, and in some cases removing some scattering particles, I preserve the raw image as shot in camera.
My experience is that underwater colours are most vibrant if correctly exposed using strobes at the right position and flash power. Every time I work on the colours in post processing I tend to get kitschy results. They are no less artistic but just not the way I experienced them under water.


Listening to Gregory Basco's techniques to achieve "raw perfection" I got new ideas what I could do in certain situations under water. I am looking forward to my next underwater photography trip to further work on my in camera skills.

See some examples of my recent work at: www.andreasrmueller.com