Thursday, March 20, 2025

Underwater Photography Checklist

A professional underwater photographer’s guide for the enthusiastic amateur.

Recently, a fellow photographer preparing for a trip to south east asia asked me: What is your pre-dive / during dive / post-dive checklist for underwater photography. - Here is what I wrote to him!


Basic Setup
  • Batteries Charged: Ensure all camera, strobe, and dive computer batteries are fully charged.
  • Memory Cards: Verify you have sufficient space (and spares) on your memory cards.

Pre-Dive

  1. Assemble and Seal the Housing
    • Securely mount the camera in the housing.
    • Check O-ring cleanliness and lubrication before closing.
    • Perform a quick test shot to confirm autofocus and strobe triggering.
    • Attach the port/lens cover to protect the glass until entry.
  2. Dive Computer Placement
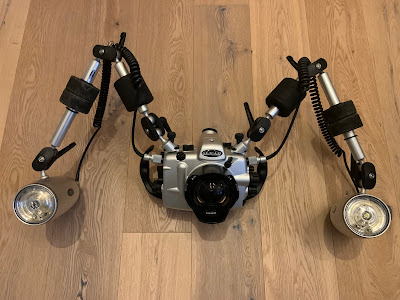
    • Some photographers attach the dive computer to a strobe arm so it’s never forgotten when jumping into the water (make sure to place it on your wrist when starting the dive).
    • Wear it on your wrist—just confirm you have it before you leave.
  3. Personal Gear Check
    • Suit up in your wetsuit/drysuit and have fins, mask, and other gear ready.
    • Plan how you will handle your camera entry: handing it from the boat or jumping in with it.
  4. Preparing for the Boat or Shore Entry
    • Transport the camera with care—ensure it’s placed securely to avoid damage.
    • Communicate with the boat crew or shore team about handing your camera to you in the water if needed.
    • In strong currents or rough conditions, it may be safer to jump in with the camera.
  5. Final Check Just Before Entry
    • Power on the camera and strobes.
    • Double-check your tank valve is open and gear is secure.
    • Let the boat crew hand you the camera a in after you jumped.
    • If using a coil lanyard or clip, attach the camera to your BCD for safe entry.
  6. Descent Routine
    • While descending, position your strobes/arms and confirm everything is functioning.
    • Watch for any leaks as you start the dive—check for bubbles or water intrusion.

During the Dive

  1. Capture as Many Images as Possible
    • Make the most of your time underwater.
    • If currents are strong, use a reef hook (where allowed) for stability while waiting for larger marine life.
  2. Quick Review
    • Briefly check the LCD for exposure (use the histogram if possible).
    • Zoom in to verify focus if you’re unsure of sharpness.
    • Minimize these checks to avoid losing buoyancy control or bumping into the reef.
  3. Situational Awareness
    • Maintain good buoyancy; keep a safe distance from corals, rocks, and other divers.
    • Perform any necessary adjustments in a stable, safe position.
  4. End of Dive Procedures
    • During your safety stop, fold in the strobe arms or secure them close to the housing.
    • Optionally, switch off camera and strobes to save battery.
  5. Surfacing with the Camera
    • Hand the camera to the boat crew first if conditions allow.
    • Remove fins and exit the water efficiently.
    • Stay aware of other divers at the ladder or exit point to avoid congestion.
  6. Exit the Water
    • Safely climb the ladder to the boat.
    • Place and secure your dive gear.
    • Ensure immediately the camera is in a safe place, secured to avoid damage.

Post-Dive

  1. Rinse and Secure
    • Place the camera in a dedicated freshwater rinse tank if available.
    • Gently soak to remove salt.
  2. Dive Computer
    • Some clip it back onto the strobe arm or wear it on the wrist—personal preference. Make sure you have it ready for the next dive.
  3. Gear Organization
    • Remove and store your wetsuit/drysuit and other gear properly.
    • Keep the camera in freshwater until you’re ready to dry it.
  4. Drying the Housing
    • After rinsing, carefully dry the housing with a microfiber towel or use compressed air to clear water from buttons and seals.
  5. Opening the Housing
    • Move to a dry, clean area.
    • Remove and recharge batteries in both camera and strobes.
    • Take out the memory card (often done at day’s end) and transfer images for backup.
  6. Maintaining O-Rings
    • Clean and re-lubricate the main housing O-ring and any port O-rings as needed.
    • Inspect for damage or debris. Replace if necessary.
  7. Preparation for the Next Dive
    • Confirm if the next dive will focus on wide-angle or macro; set up accordingly.
    • If you know your next lens choice, install and prepare the correct port in advance.


Maintenance Kit Essentials

Keep a small kit handy for quick repairs, adjustments, and O-ring maintenance:

  • Swiss Army Knife (or Multi-Tool): Great for cutting, tightening, and small fixes.
  • Lens Blower & Microfiber Cleaning Cloth: Safely remove dust and water droplets from lens and ports.
  • Spare O-Rings: Have replacements for the main housing, strobes, and ports (button O-rings can be tricky, but replacements for the primary ones are crucial).
  • Allen (Hex) Keys & Zip Ties: Useful for tightening clamps, arms, or other housing components.
  • Guitar Pick: Ideal for gently removing O-rings without damaging them.
  • O-Ring Grease: Use only the lubricant recommended by the manufacturer.
  • Cotton Swabs (Q-tips): Helpful for detailed O-ring cleaning in grooves and corners.
  • Lens/Glasses Cleaning Wipes: Can be used to clean lens surfaces or gently wipe around O-rings (ensure they’re free from harsh chemicals).

Pro Tips for a Smooth Experience

  • Plan Ahead: Talk with your dive guide about potential subjects so you’re prepared for macro or wide-angle opportunities.
  • Charge Often: Even if your battery can last two days, it’s best to recharge after each day or each dive session to minimize risks.
  • Protect Your Gear: Keep your camera station organized on the boat; others might not appreciate how delicate it is.
  • Check Regularly: A quick post-dive inspection helps catch minor leaks or issues before the next dive.
  • Conserve Air & Focus: Limit fiddling with settings mid-dive; maintain good buoyancy to avoid collisions with coral or other divers.

Enjoy your underwater adventures!
Capture every magical moment beneath the surface—while respecting and preserving the marine environment. Safe diving and happy shooting!

Sunday, August 20, 2023

Macro Photography using Bokeh Masks

Abstract

Macro photography is a unique genre of photography, which focuses on capturing small subjects in extreme detail. One of the artistic techniques that can be utilized in macro photography is the use of bokeh masks to create specific and shaped bokeh effects in the out-of-focus areas of a photograph. This white paper elucidates the concept and practice of using bokeh masks in macro photography and the optical explanation behind it.

Introduction

Bokeh, derived from the Japanese word "boke" meaning "blur" or "haze", is a photographic term used to describe the aesthetic quality of the out-of-focus areas in a photograph. Bokeh masks are physical masks that photographers place in front of their camera lens to shape this out-of-focus blur into specific patterns or designs.

Methodology

1. Materials Needed:

  • Camera with a fast lens (typically f/2.8 or larger aperture)
  • Macro lens or extension tubes for closer focusing
  • DIY or purchased bokeh masks
  • External light source (optional)

2. Making a Bokeh Mask:

A bokeh mask can be crafted from a piece of black paper, card, or plastic. Cut out a small shape (e.g., heart, star, or any custom design) in the middle of the card. The diameter of the card should match the diameter of the lens you are using. When the camera is focused on a subject, the out-of-focus light sources or highlights will adopt the shape of the cut-out.

3. Setting Up:

  1. Mount the macro lens on the camera.
  2. Place the bokeh mask over the lens.
  3. Adjust camera settings to a wide aperture (e.g., f/2.8 or larger).
  4. Focus on the desired subject, ensuring there are light sources or reflective elements in the background.

Optical Explanation

The principle behind the bokeh mask's effect on photographs stems from the way camera lenses handle out-of-focus light sources.

  1. Aperture Shape: The aperture inside the lens is usually made up of several blades which, when opened or closed, forms a certain shape. Most lenses create a circular aperture, which results in round bokeh balls. The shape of the bokeh mask effectively replaces the shape of the aperture for out-of-focus light sources, thus creating bokeh that matches the shape of the mask.
  2. Depth of Field: Using a wide aperture reduces the depth of field, meaning a smaller portion of the image is in sharp focus. Everything outside of this zone becomes blurred, making it ideal for the bokeh effect.
  3. Light Diffraction: When light passes through a small opening (like our bokeh mask shape), it tends to bend and scatter. The shape of the mask constrains this diffraction to its own form, imprinting that shape onto any defocused light within the image.

Applications and Benefits

  1. Creative Expression: Bokeh masks allow photographers to add a unique and artistic touch to their macro shots. Specific shapes can evoke emotions or enhance the story of the image.
  2. Enhanced Subject Emphasis: By using distinct bokeh shapes, photographers can draw more attention to their main subject, making it stand out against a creatively blurred background.
  3. Holiday and Seasonal Photography: Bokeh masks can be tailored for different seasons and holidays, like stars for Christmas or hearts for Valentine's Day.

Conclusion

Macro photography using bokeh masks is an intersection of science and art. While the optical principles underpinning the method are rooted in physics, the results are pure artistry. Through understanding and harnessing these optical effects, photographers can elevate their macro images to new creative heights.

Friday, July 21, 2023

Delving Deep: The World of Rare Underwater Lenses

Underwater photography is a mesmerizing realm, where light, colors, and clarity converge in ways unlike anywhere else. Capturing this magical underwater universe requires specialized gear, with lenses being at the heart of it all. While many photographers are acquainted with popular underwater optics, the universe of rare underwater lenses remains mostly uncharted. In this post, we'll plunge into some of the most elusive and coveted lenses designed specifically for capturing Neptune's kingdom.


1.
Nikonos 13mm f/2.8

This lens, designed for the Nikonos underwater camera system, is a legendary piece. The Nikonos 13mm was not just the widest lens for the system but was also amphibious, meaning it worked both in and out of water. Its unique construction and top-tier optical performance have made it a collector's favorite.

Underwater camera housing manufacturer SeaCam has developed an option in order to use this extraordinary lens with exceptional optical performance on DSLR cameras.

2. Sea & Sea 12mm f/13 Fish-Eye

Built specifically for underwater use, the Sea & Sea 12mm offered a stunning 167° angle of view. It was praised for its minimal distortion and ability to capture wide vistas, making it perfect for shooting expansive coral reefs or schools of fish.

3. Hugyfot 150mm f/2.8

While wide-angle lenses dominate the underwater scene, there's a demand for macro optics to capture the smaller denizens of the deep. The Hugyfot 150mm is a gem in this category. Known for its razor-sharp imagery, it allows photographers to get up close and personal with tiny marine creatures.

4. Zeiss Divegon 16mm f/5.6

Zeiss, a name synonymous with optical excellence, once ventured into underwater photography with the Divegon series. The 16mm was a standout, offering impeccable sharpness and color rendition, capturing the ethereal beauty of underwater landscapes.

5. Subal 3D Underwater Housing for Canon EF 8-15mm f/4L

While technically not a lens, this housing deserves mention. Created for the Canon EF 8-15mm lens, it allowed for 3D underwater photography – a rarity in itself. The housing combined two Canon lenses, paving the way for capturing underwater worlds in mesmerizing 3D.

Why the Pursuit of Rare Underwater Lenses?

The deep-sea allure is evergreen, and unique challenges emerge when shooting beneath the waves. Rare lenses, often born from specific needs or inventive collaborations, offer underwater photographers opportunities to see and depict the marine world differently. The unique rendering of colors, contrasts, and field-of-view these lenses provide can elevate an image from ordinary to extraordinary.

Final Bubbles

Navigating the abyss of rare underwater lenses is a journey filled with tales of innovation, dedication, and passion. They stand as beacons for those photographers wishing to portray the undersea world in ways less traveled. For the ardent underwater photographer or the discerning collector, these lenses are a testimony to humanity's endeavor to capture the ethereal beauty that exists below the surface.

Exploring the World of Rare Photographic Lenses

In the vast universe of photography, lenses are like magic wands. They determine how we capture and interpret light, shape our perspectives, and crystallize moments into memories. While most photographers are familiar with popular lens choices, the world of rare lenses brings forth a blend of mystique and intrigue. These lenses, often born out of specific needs or unique collaborations, can offer novel creative avenues for photographers. In this post, we will dive into some very rare lenses that have graced the world of photography.


1. Carl Zeiss Planar 50mm f/0.7

One of the most legendary lenses in photographic history, the Carl Zeiss Planar 50mm f/0.7 was originally developed for NASA's Apollo lunar program. It is incredibly fast and was later used by Stanley Kubrick in the film "Barry Lyndon" to shoot candlelit scenes without any artificial lighting. Only ten of these were ever made, making it an incredibly rare piece.

2. Leica Noctilux 50mm f/1.0

Known for its dreamy bokeh and superb low-light performance, the Noctilux series by Leica is iconic. The 50mm f/1.0 version stands out due to its ability to render images with a unique softness while maintaining sharpness, offering a surreal quality to portraits.

3. Nikkor 6mm f/2.8 Fisheye

This lens stands out not just because of its rarity but also its distinctive design. It has a 220° field of view, effectively seeing behind itself. Introduced in the 1970s, its bulbous front element is instantly recognizable and is perfect for creating unusual and captivating fisheye images.

4. Canon 1200mm f/5.6L EF

Often referred to as the "mother of all telephoto lenses", this behemoth from Canon is one of the largest and rarest lenses available. It's so rare that even sightings of this lens are newsworthy. It's primarily used for specialized wildlife or sports photography.

5. Zeiss Apo Sonnar T 1700mm f/4*

This is one of the largest telephoto lenses ever made. It was custom-built for a client and tips the scale at around 256kg. Its specific use and the identity of its owner remain somewhat of a mystery.

6. Pentax 250mm f/5.6 110

Designed for the Pentax Auto 110 system (one of the tiniest SLR systems ever made), this lens is rare because of the camera system it belongs to. While the lens is tiny, its rarity and the results it produces make it a sought-after collector's item.

Why Seek Rare Lenses?

The appeal of rare lenses isn't just in their scarcity. These lenses offer unique optical characteristics that are hard to replicate with mainstream lenses. They often bring out a distinctive rendition of colors, bokeh, and sharpness, allowing photographers to experiment and create unique images.

In Conclusion

The world of rare lenses is like an uncharted territory, filled with stories, peculiar designs, and unparalleled optical magic. While acquiring them can be a challenge (and quite an investment), they can provide a fresh perspective in a photographer's journey. Whether you're a collector or a passionate photographer, these lenses are testament to the ever-evolving art and science of photography.

Saturday, May 27, 2023

Adobe Lightroom for Underwater Photographers: Capabilities and New Features

Adobe Lightroom has been a preferred choice for photo editing and organization for years. As a software, it blends simplicity with powerful editing tools to transform images in an intuitive and non-destructive way. One specific genre of photographers that greatly benefits from Lightroom's capabilities are underwater photographers. This article aims to shed light on how Adobe Lightroom supports the creative endeavors of underwater photographers and the newest features that make it a strong tool.

Adobe Lightroom for Underwater Photographers

Underwater photography is a unique discipline that has its own set of challenges, especially when it comes to post-processing. Adobe Lightroom offers several tools and capabilities specifically suited to addressing these challenges.

White Balance and Color Correction

The first significant issue for underwater photographers is the color distortion caused by the water's depth. As you go deeper, the light spectrum changes and images tend to skew toward the blue or green end of the spectrum. Adobe Lightroom comes with advanced color correction capabilities, allowing photographers to adjust white balance post-capture, bringing back the true colors of the underwater scene.

Noise Reduction

Underwater photographers often need to crank up the ISO to deal with the relatively low-light conditions underwater, which could introduce noise. Lightroom's noise reduction capabilities can help to manage and reduce noise, maintaining the clarity and crispness of the photograph. Specially the new AI based noise reduction algorithm does a pretty good job.

Lens Corrections

Underwater housings and ports can distort images, causing aberrations. Adobe Lightroom has a lens correction feature that can fix this distortion, providing the ability to manually adjust the vertical and horizontal perspective as well as correcting for chromic aberrations.

Detail Enhancement

Often, intricate details of the underwater life may get lost due to limited light and water clarity. Lightroom’s clarity, texture, and dehaze sliders can enhance these details, making the image more vibrant and revealing the hidden beauty of the underwater world.

Newest Features in Adobe Lightroom (as of 2023)

Adobe continually enhances Lightroom with newer features, making it even more powerful for underwater photographers.

Super Resolution

With the Super Resolution feature, photographers can now upscale their photos without losing details. This feature uses machine learning to increase the resolution of the photo, which could be beneficial for printing large format images or for heavy cropping.

Advanced Color Grading

The color grading tool, an upgrade on the older split toning, allows photographers to apply color tints to the shadows, midtones, and highlights separately. For underwater photographers, this feature can help achieve more creative color grading, helping the underwater life in the image to stand out.

Faster Performance

Adobe has made significant strides in improving Lightroom's performance, resulting in faster import, preview generation, and export times. A smooth and responsive editing experience is invaluable for photographers with large batches of underwater photos.

Improved Masking

The recent updates have introduced a new Masking panel which includes Select Subject and Select Sky. These can be particularly helpful for underwater photographers when editing creatures or specific underwater features. As well as in the process of removing backscatter particles.

Presets and Profiles

While not entirely new, Adobe Lightroom continues to expand its offering of built-in presets and creative profiles, which could provide a good starting point for editing underwater photos, and help in maintaining a consistent style.

To conclude, Adobe Lightroom offers a wealth of features that can help underwater photographers overcome the unique challenges posed by their genre. The continuous updates and added features keep enhancing its capabilities, maintaining Lightroom's position as an indispensable tool in the digital darkroom for underwater photographers.